 HuntGrid
Guide · 9 min read
E-scouting public land for deer
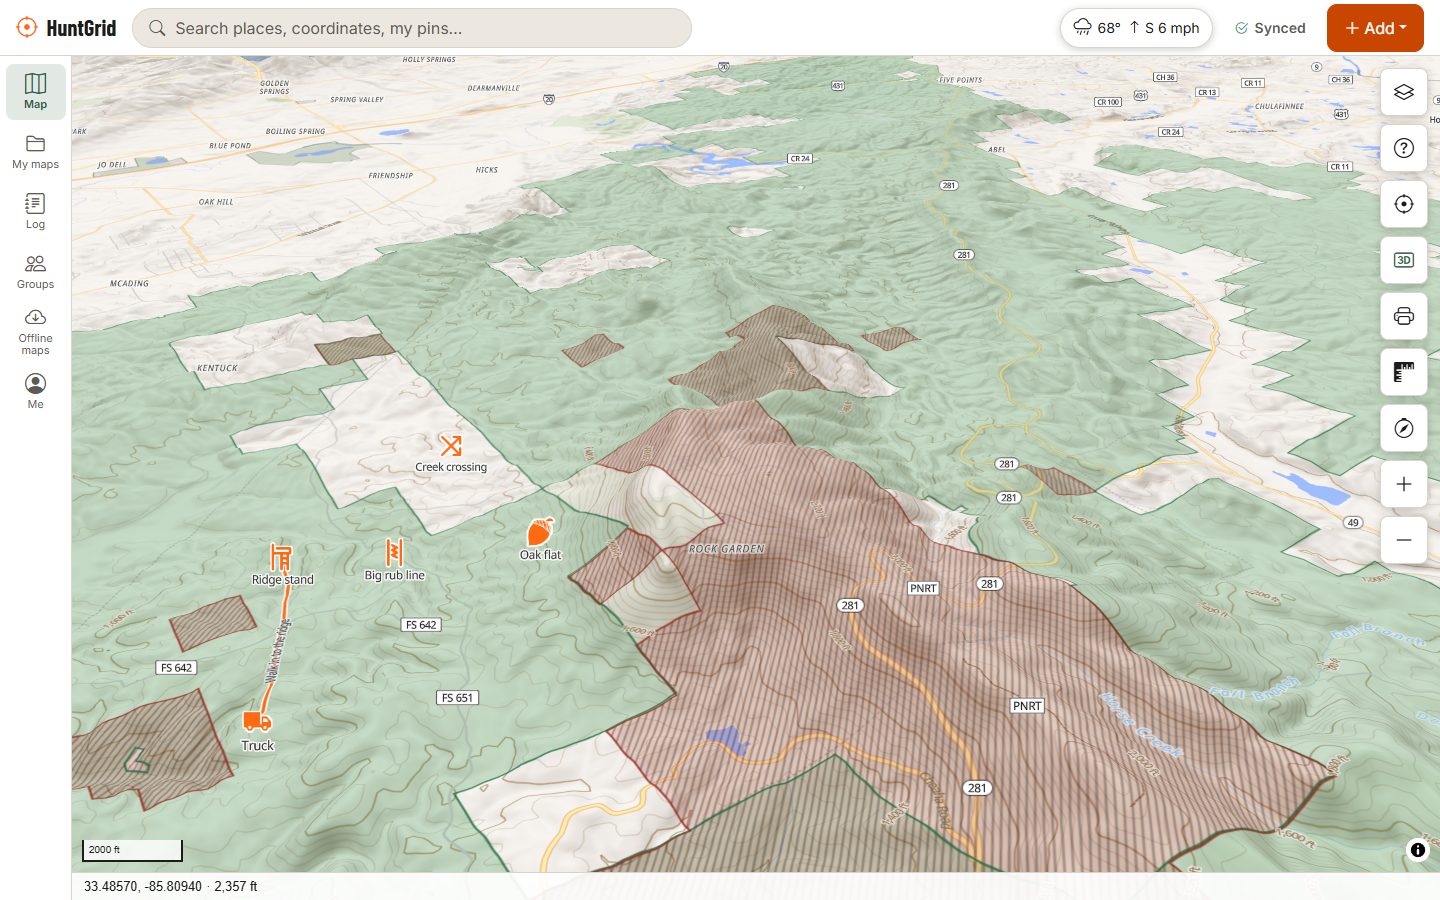
Good public-land hunters walk less and find more, because they do the first round of scouting at the kitchen table. A few evenings with topo, satellite and 3D terrain can turn thousands of acres into a handful of spots worth a pair of boots.
Map data © OpenStreetMap contributors, © OpenMapTiles; terrain: Copernicus WorldDEM-30 (credits)
On this page
Start with the rules and the boundaries
Before you look for deer, look at where you're allowed to hunt them. Pull up the public land, the hunting unit and the closed areas, and read the rules for that property and season. There's no point falling in love with a bench that turns out to be in a safety zone or a closed refuge unit. In HuntGrid, the public land and access layers, hunting units and "Can I hunt here?" sit on the same map you scout on.
Learn to read the map layers
Topo and contours
Contour lines join points of the same elevation. Lines close together mean steep ground; lines far apart mean gentle slopes or flats. Where contours form a V or U pointing uphill, you're looking at a draw or drainage; where they point downhill, it's a ridge or spur. Once you can see those shapes, the features deer use jump out.
Hillshade, slope and 3D terrain
Shading turns contours into landforms you can read at a glance. Slope shading highlights the steep pitches deer avoid and the gentle ones they travel. 3D terrain lets you tilt the map and look at a ridge the way you'd see it from the next hill, which is often when a saddle or a bench finally makes sense.
Satellite imagery
Satellite shows what topo can't: where the timber changes from hardwoods to conifers, the edges of clearcuts and burns, fields, swamps, beaver ponds and old logging roads. Look at the date and season of the imagery, since a cut from ten years ago may be thick regrowth now.
The terrain features deer use
- Saddles: low points on a ridge between two higher points. Deer crossing the ridge tend to use them because they're the easiest way over.
- Benches: flat shelves on a hillside, where contours spread apart for a moment. Deer travel along them and often bed on them, with the wind at their back and a view below.
- Funnels and pinch points: anywhere cover or terrain narrows movement: a strip of timber between two fields, a gap between a lake and a cliff, the head of a drainage, a creek crossing.
- Edges: where one type of cover meets another (mature timber and young regrowth, a swamp and a hardwood ridge, a field and the woods). Deer love transitions, and inside corners of fields are classic.
- Points and ridge ends: common bedding spots, where a deer can watch downhill and smell what's behind it on rising or falling air.
- Water: less important where it's everywhere, very important in dry country and early-season heat. A pond or seep far from roads can be a magnet.
- Food: acorns and other mast, crop fields next to public land, and young growth after logging or fire. Food changes through the season, so your best spot in October may be empty by December.
Map the hunting pressure
On public land, other hunters shape deer movement as much as terrain does. Mark the parking areas, trailheads, gates and roads, and assume most of the pressure comes from them. Then look for what most people skip:
- Ground behind an obstacle: across a creek or river, up a steep climb, through a thick swamp or a big clearcut.
- Long walks from any road, especially uphill.
- Small, overlooked pockets close to the road that everyone drives past on the way to the "big woods".
Pressured deer often bed in the thickest, most awkward cover they can find and move in daylight only where they feel safe. That's where your e-scouting should be pointing you.
A simple e-scouting routine
Go broad
Look at the whole property for likely bedding cover, food and water. Mark them with different pins.
Connect the dots
Find the saddles, benches and funnels deer would use to travel between bedding and food. Those travel routes are where you will likely hunt.
Pick setups for the wind
For each spot, work out the winds that keep your scent off the trail and the route you'd walk in. Our guide on hunting the wind covers how.
Rank and save
Keep your best five to ten spots, measure the walk in, check the elevation profile of the route, and download the area for offline use.
Then put boots on the ground
A map is a theory. Only the woods tell you if it's true. When you walk in, look for:
- Trails and tracks, especially where several trails come together.
- Rubs and scrapes: rub lines often trace a buck's travel route between bedding and food.
- Beds, droppings and browse, which show where deer actually spend time.
- Signs of other hunters: boot tracks, flagging tape, stands, spent shells.
The best time to scout hard is after the season or in late winter and early spring, when last fall's sign is still visible and you won't disturb the deer you'll hunt. During the season, stay out of bedding areas, keep visits short and midday, and let the wind decide where you walk.
As you go, drop pins for what you find. HuntGrid has 88 hunting icons for stands, sign and camp, lets you draw a rub line or trail, record your track, and add photos and voice notes to a pin. Everything saves offline and syncs later, and you can import pins from another app or GPS.
Trail cameras: extra eyes, with rules
Trail cameras confirm what you think a spot is doing, and show you when. Before you hang one, check the rules: some jurisdictions and public lands restrict or regulate trail cameras, require your name or a licence number on them, or set dates for placing and removing them. Face cameras away from the rising or setting sun to avoid washed-out photos, and lock them up on public land.
HuntGrid puts each camera on the map with the way it faces, and you can import photos from any brand to see activity by hour, moon and wind. Add your own sightings, and the sightings heatmap shows where deer keep turning up across seasons.
The goal: fewer, better sits
E-scouting doesn't replace woodsmanship. It focuses it. The hunter who walks into the woods with three tested spots, a plan for each wind and a route that doesn't blow out the deer has already done most of the work. The rest is patience, and following the regulations for the land and the season you hunt.
Questions
Still have a question? Read the help pages or email support@huntgrid.net.
What is e-scouting?
Scouting a hunting area on maps before you go: topo, satellite imagery, 3D terrain and land boundaries, to find likely bedding, food, water and travel routes. You then confirm the best spots on foot.
How do you find a saddle on a topo map?
Follow a ridge line and look for a low point between two higher points, where the contour lines pinch in from both sides. Deer often cross ridges there because it is the easiest way over.
Where do deer bed on public land?
Usually in thick cover away from pressure: benches and points on hillsides, regrowth after logging, swamp edges and islands, and other spots that are hard for people to reach. Confirm with beds and sign on the ground.
When is the best time to scout for deer?
Right after the season and in late winter or spring, when last fall's sign is still visible and you won't disturb deer before the season. In-season scouting should be short, light and wind-aware.
Are trail cameras allowed on public land?
It depends. Some jurisdictions and public lands restrict, regulate or ban them, or require identification and dates for removal. Check your regulations and the land manager's rules.
Your next hunt starts on the map
Create a free account, download your area and head out. No credit card, no per-state fees.
Already have an account? Sign in